前回は、画像を使って同一人物かどうかの判定を行いました。

今回、ウェブカメラを使ってリアルタイムに判定するのと、入出管理するために名前と時間をcsvに書き出すようなコードを書いてみます。
2段階のフェーズに分けて実装していきます。
1つ目がウェブカメラを使ってリアルタイム判定
2つ目がcsvへの書き出し
リアルタイム判定の実装
前回のコードも利用していくので、適宜コピペして対応していってください。
まず、手動で画像ファイルを読み込んでいたのを自動化します。printで画像のファイル名一覧が表示されているか確認します。
import cv2
import numpy as np
import face_recognition
import os

path = 'image'
images = []
classNames = []
myList = os.listdir(path)
print(myList)
拡張子を除いたファイル名が欲しいので、その処理を加えます。
for cls in myList:
    current_img = cv2.imread(f'{path}/{cls}')
    images.append(current_img)
    classNames.append(os.path.splitext(cls)[0])

print(classNames)
前回の顔のエンコードをしていた処理を関数化しておきます。
ついでにエラーが起きないかも確認しておきます。
def find_encodings(images):
    encode_list = []
    for img in images:
        img = cv2.cvtColor(img, cv2.COLOR_BGR2RGB)
        encode = face_recognition.face_encodings(img)[0]
        encode_list.append(encode)
    return encode_list

encode_list_known = find_encodings(images)
print(len(encode_list_known))
ここまでできたらOpenCVを使ってウェブカメラを取得し、前回のコードを使用しながら顔認識をしていきます。
cap = cv2.VideoCapture(0)
while True:
success, img = cap.read()
img_resize = cv2.resize(img, (0, 0), None, 0.25, 0.25)
img_resize = cv2.cvtColor(img_resize, cv2.COLOR_BGR2RGB)
face_frame = face_recognition.face_locations(img_resize)
encode_frame = face_recognition.face_encodings(img_resize, face_frame)
for encode_face, face_loc in zip(encode_frame, face_frame):
matches = face_recognition.compare_faces(encode_list_known, encode_face)
face_dis = face_recognition.face_distance(encode_list_known, encode_face)
print(face_dis)
match_idx = np.argmin(face_dis)
# print(matches)
# matches < 0.6
if matches[match_idx]:
name = classNames[match_idx].upper()
print(name)
y1, x2, y2, x1 = face_loc
y1, x2, y2, x1 = y1*4, x2*4, y2*4, x1*4
cv2.rectangle(img, (x1, y1), (x2, y2), (0, 255, 0), 2)
cv2.rectangle(img, (x1, y2-35), (x2, y2), (0,255,0),cv2.FILLED)
cv2.putText(img, name, (x1+6, y2-6), cv2.FONT_HERSHEY_COMPLEX, 1, (255, 255, 255), 2)
cv2.imshow('WebCam', img)
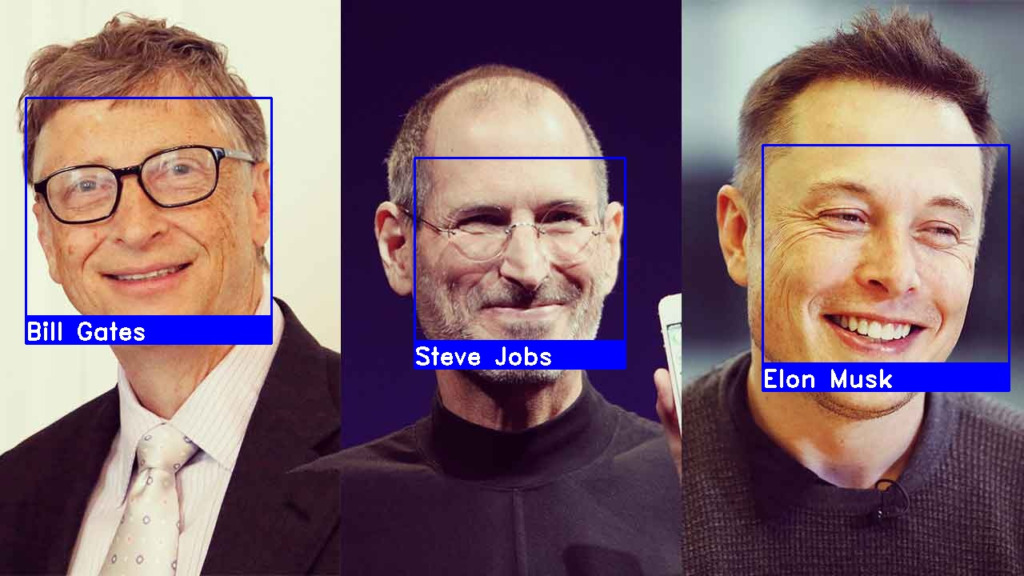
cv2.waitKey(1)この状態で、実行してみると顔認識ができていることが確認できます。
if文以下は画像を格納しているファイルとあなたの顔がある程度一致しないと処理が走らないようになっています。
なので、自撮りの画像を格納するか自身と似ている芸能人の画像を持ってきて格納してください。
そうすると顔が枠で囲まれ、一致している画像のファイル名が表示されます。
ここまでで、リアルタイム判定の実装完了です。
CSVファイルへの入出時間と本人確認の書き出し
時間を扱うので、追加でdatetimeパッケージをimportしておきます。
import cv2
import numpy as np
import face_recognition
import os
from datetime import datetime
続いて、書き込むためのcsvファイルを作成し、ヘッダーだけ書き込んでおきます。
attend.csv
Name,Timecsvに書き込むための関数をfind_encodingsの下あたりに書いていきます。
def mark_attendance(name):
    with open('attend.csv', 'r+') as f:
        my_data_list = f.readlines()
        name_list = []
        for line in my_data_list:
            entry = line.split(',')
            name_list.append(entry[0])
        if name not in name_list:
            now = datetime.now()
            time = now.strftime('%H:%M:%S')
            f.writelines(f'\n{name},{time}')


mark_attendance('a')
最後に関数を実行していますが、csvファイルに書き込まれているか確認してください。
確認が取れれば、最後の行は削除して構いません。
最後にOpenCVの処理の中で、人物一致が取れたら入出管理の方に書き込むようにすれば完了です。
        if matches[match_idx]:
            name = classNames[match_idx].upper()
            print(name)
            y1, x2, y2, x1 = face_loc
            y1, x2, y2, x1 = y1*4, x2*4, y2*4, x1*4
            cv2.rectangle(img, (x1, y1), (x2, y2), (0, 255, 0), 2)
            cv2.rectangle(img, (x1, y2-35), (x2, y2), (0,255,0),cv2.FILLED)
            cv2.putText(img, name, (x1+6, y2-6), cv2.FONT_HERSHEY_COMPLEX, 1, (255, 255, 255), 2)
            mark_attendance(name)
以上で、リアルタイム判定と入出管理が実装できました。
今回はローカルの画像を取得して判定しましたが、DB側に画像を保存して読みにいくようにしたり、人物一致のハードルを上げたりすれば顔認証っぽいものは実装できます。
是非チャレンジしてみてください。
全体コードの記載
import cv2
import numpy as np
import face_recognition
import os
from datetime import datetime

path = 'image'
images = []
classNames = []
myList = os.listdir(path)

for cls in myList:
    current_img = cv2.imread(f'{path}/{cls}')
    images.append(current_img)
    classNames.append(os.path.splitext(cls)[0])

def find_encodings(images):
    encode_list = []
    for img in images:
        img = cv2.cvtColor(img, cv2.COLOR_BGR2RGB)
        encode = face_recognition.face_encodings(img)[0]
        encode_list.append(encode)
    return encode_list

def mark_attendance(name):
    with open('attend.csv', 'r+') as f:
        my_data_list = f.readlines()
        name_list = []
        for line in my_data_list:
            entry = line.split(',')
            name_list.append(entry[0])
        if name not in name_list:
            now = datetime.now()
            time = now.strftime('%H:%M:%S')
            f.writelines(f'\n{name},{time}')


encode_list_known = find_encodings(images)
print(len(encode_list_known))

cap = cv2.VideoCapture(0)

while True:
    success, img = cap.read()
    img_resize = cv2.resize(img, (0, 0), None, 0.25, 0.25)
    img_resize = cv2.cvtColor(img_resize, cv2.COLOR_BGR2RGB)

    face_frame = face_recognition.face_locations(img_resize)
    encode_frame = face_recognition.face_encodings(img_resize, face_frame)

    for encode_face, face_loc in zip(encode_frame, face_frame):
        matches = face_recognition.compare_faces(encode_list_known, encode_face)
        face_dis = face_recognition.face_distance(encode_list_known, encode_face)
        print(face_dis)
        match_idx = np.argmin(face_dis)

        if matches[match_idx]:
            name = classNames[match_idx].upper()
            y1, x2, y2, x1 = face_loc
            y1, x2, y2, x1 = y1*4, x2*4, y2*4, x1*4
            cv2.rectangle(img, (x1, y1), (x2, y2), (0, 255, 0), 2)
            cv2.rectangle(img, (x1, y2-35), (x2, y2), (0,255,0),cv2.FILLED)
            cv2.putText(img, name, (x1+6, y2-6), cv2.FONT_HERSHEY_COMPLEX, 1, (255, 255, 255), 2)
            mark_attendance(name)

    cv2.imshow('WebCam', img)
    cv2.waitKey(1)